One-piece Garments - tougher than you think
One-piece garments - tougher than you think
 |
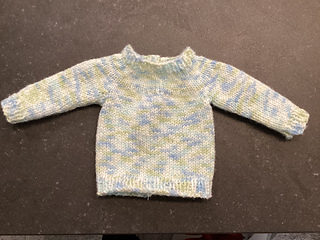
| My first one-piece sweater |
- You can try out a new yarn to see if you like it.
- The doll won't care if the yarn is scratchy
- You can test an unfamiliar technique, such as cables
- You can often use the test swatch as a cut & sew front of a doll sweater
- It doesn't use a whole lot of yarn to make doll clothes
- A garment for a doll doesn't become your life's work
- Doll clothes can easily be donated to charity
So with that goal in mind, I also decided that the ability to knit those clothes in one piece (or a minimum number of pieces) so I wouldn't have to do a lot of seaming, might be a real advantage.
Not only does a one piece garment reduce seaming, but it would provide a continuous area on the garment for slip designs, fair isle patterns or other decoration. And the whole distance around the body of a doll wouldn't use all the needles on my machine bed.
I felt from the bottom hem up to the armhole could be a perfect area to play experiment. Great idea, right?
Uh not exactly. Turns out that it is tougher than you would expect. I found that you cannot just knit up from the bottom hem and then increase a bunch for the sleeves. The knitted fabric simply won't stretch that far. And you cannot start from the neck down and keep increasing for a circular yoke for the same reason. The neck stitches won't allow you to increase beyond a certain point.
However, the good news is that I did manage to do a one-piece sweater, then a dress. Thanks to Irene Woods and her most excellent instructions for circular yoke sweaters I found on her Facebook group, Machine Knitting Round Yokes.
The Yoke Starts here
Irene starts at the largest part of the yoke, which is the area right before the sleeve division and works upward to the neckline in tiers. Each tier is removed on waste yarn, then rehung on fewer hooks than the previous tier, thus incorporating the necessary decreases for the shaping needed.
On an adult or child sweater, you need to do the yoke in three pieces, but maybe, just maybe, a doll sweater wouldn't use up too many needles and I could do it in one piece around. And yes, it worked! With modifications of course.
I started with a few rows of waste yarn, then knitted a few rows with the main yarn. Then I transferred one third of the stitches to neighbouring needles. I removed the work on waste yarn, then rehung on the smaller number of needles. Tier 1 done. I did two tiers, then after the final reduction, I took the remaining stitches, designated for the neckline, off on waste yarn. (I knitted the neckline, sleeve cuffs and bottom hem by hand)
 |
| Close up of the tiers - it is hard to see the decreases! |
At this point, you must count out the stitches designated for one front, one sleeve, the back, the other sleeve and the other front. You have to rehang the stitches and knit each of the sleeves now, otherwise you will not be able to knit them later. I can confirm this!
At this point, the yoke is done and the two sleeves. You need to rehang the body of the sweater, pushing the sleeves out of the way and only then, can you knit the body from the underarms down to the hem in one piece. No seaming, other than under the arm.
So just to summarize, knit from the sleeve division upward to the neckline, scrap off, rehang and work downward for each sleeve, scrap off, rehang and work downward again for the body. Basically, you can work from more stitches to fewer, but not fewer stitches to more. or as i remind myself, I can work Big to Little, but not Little to Big.
 |
| The finished sweater I can see great possibilities with this one-piece garment technique. I want to try this for a doll dress, and experiment with some fair isle, and a slip stitch panel. |
Comments and photos, please!
I welcome your comments. If you have photos of your finished projects, I would love to see them.
Your Knotty friend, The Knotty Sloth


Comments
Post a Comment